
When the spore test grows
Key Takeaways:
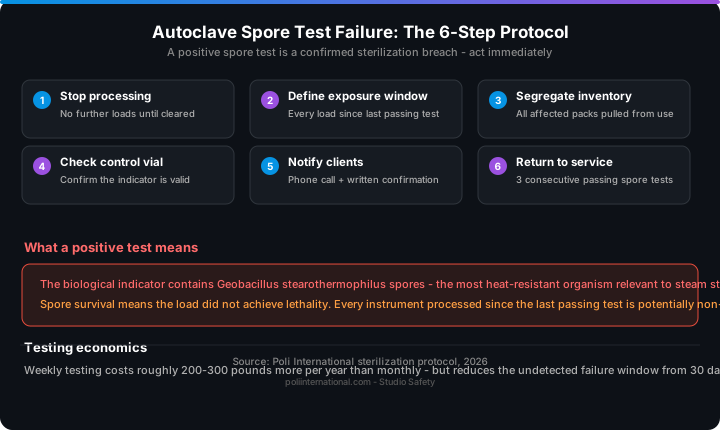
» A positive spore test is a confirmed sterilization breach; every instrument processed since the last passing test is potentially non-sterile
» Immediate containment: stop processing, define the exposure window, segregate all affected inventory, check the control vial
» Client notification is an ethical and often legal obligation; phone call plus written confirmation, with an offer to cover testing costs
» Three consecutive passing spore tests are required before the autoclave returns to service
» Weekly spore testing costs roughly 200-300 pounds more per year than monthly testing but reduces the undetected failure window from 30 days to 7 days
1. What a failed spore test actually means
A biological indicator contains a known population of Geobacillus stearothermophilus spores, the most heat-resistant spore-forming organism relevant to steam sterilization. The indicator is placed in the most challenging location within the load, usually the centre of a fully wrapped instrument pack, and run through a complete autoclave cycle. After processing, the vial is incubated at 55-60 degrees C for 24-48 hours. If the spores survive and germinate, the medium changes colour or becomes turbid.
That colour change means one thing: the conditions inside that load did not achieve lethality. The autoclave may have reached temperature at the sensor on the wall. The printout may look normal. But somewhere inside the pack, steam did not penetrate, the temperature did not hold, or the cycle was compromised in a way the machine's own sensors did not detect. A failed spore test is not a near-miss. It is a confirmed sterilization breach.
2. Immediate containment: the first hour
Stop processing everything. Do not run another load. Do not open any pouches from the affected period. The autoclave is offline until the root cause is identified and corrected, and three consecutive passing spore tests confirm it is functional again.
Define the exposure window. Pull your sterilization log. Identify the date of the last documented passing biological indicator. That date marks the start of the exposure window. Every instrument sterilized between that date and the failed test is potentially non-sterile.
Tag and segregate all affected inventory. Physically move all instruments processed within the exposure window to a clearly labelled quarantine area. The segregation must be unmistakable to anyone who opens the supply cabinet.
Check the control vial. Every biological indicator test includes a control vial that was not processed through the autoclave. If the control vial also shows no growth, the batch of indicators may be defective. If the control grows and the test vial grows, the autoclave failed. If both fail to grow, the indicators themselves may be compromised and the test is invalid, but you still need to confirm the autoclave is functioning before processing instruments.
3. Client notification
This is the hardest part of the protocol and the one where studios most often fail. Cross-reference your appointment book with your sterilization log for the exposure window. Every client who received a procedure using instruments processed during that window should be notified. An infection can be subclinical for weeks or months. Hepatitis B can incubate for 60-90 days before symptoms appear. The absence of a visible infection does not mean the instrument was sterile.
The notification should be direct and factual. Include the date the failure was identified, the exposure window, a recommendation to consult a healthcare provider for bloodborne pathogen testing (hepatitis B, hepatitis C, HIV), and an offer to cover the cost of testing. Phone call first, then written confirmation. Document every notification attempt.
| Notification element | Requirement |
|---|---|
| Timing | As soon as failure is confirmed (valid control vial + identified exposure window) |
| Method | Phone call first, then written confirmation (email or letter) |
| Content | Date identified, exposure window, testing recommendation, specific pathogens, offer to cover costs, contact number |
| Documentation | Document every attempt including unanswered calls and returned mail |
4. Troubleshooting: finding the root cause
Autoclaves fail for a limited set of reasons. Work through this list systematically before calling a technician.
| Likely cause | What to check | How to verify |
|---|---|---|
| Water quality | Conductivity of feed water. Tap water, softened water, or old distilled water are common culprits | Test with conductivity meter. Maximum acceptable: 5 microS/cm |
| Overloading | Pack density and arrangement. Instruments packed too tightly prevent steam penetration | Pouches on edge, not flat. Leave space between packs. B-cycle autoclave loaded like N-cycle will fail |
| Door seal failure | Visible damage, cracking, or flattening of silicone door gasket | Inspect visually. Replace gasket if damage visible (annual replacement is standard) |
| Insufficient pre-cleaning | Residual organic material on instruments shields microorganisms from steam | Inspect instruments under magnification after ultrasonic cleaning |
| Cycle selection error | Wrong cycle type for the load. N-cycle for wrapped instruments cannot achieve sterility | Wrapped instruments require B-cycle (vacuum) per EN 13060 |
| Sensor drift | Internal sensors may report correct conditions while actual chamber conditions are outside spec | Requires technician with calibrated test equipment |
After correcting the identified cause, run three consecutive spore tests with the biological indicator in the most challenging location. All three must pass before the autoclave returns to service.


