Studio design as the first line of infection control
Key Takeaways:
» Studio infection control starts with physical design: zone separation, surface materials, and airflow cannot be compensated for by procedure discipline alone
» Three zones (clean, transitional, contaminated) with one-way workflow and no backtracking prevent cross-contamination at the architectural level
» Every surface in procedure and decontamination rooms must be non-porous, chemical-resistant, and seamless
» Procedure rooms need minimum 6 air changes per hour with MERV-13 filtration and positive pressure relative to corridors
» Biohazard waste stays in the contaminated zone; sharps disposal must be within arm's reach of the procedure station
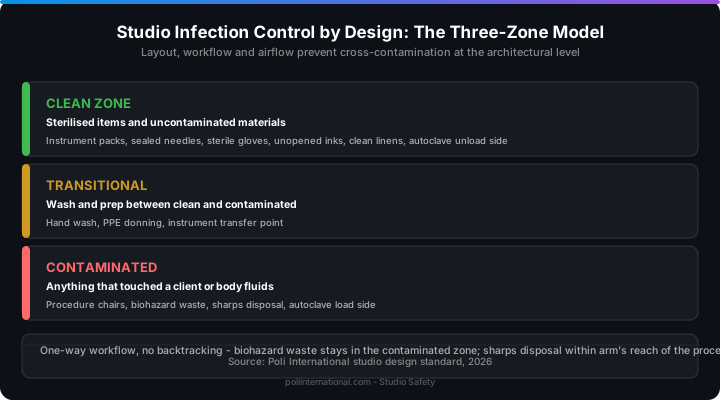
1. The three-zone model
Infection control does not start at the autoclave. It starts with the walls, the floors, the airflow, and the path an artist walks between the front desk and the procedure chair. A studio that has its clean supplies stored next to its biohazard bin has already failed, regardless of how well it sterilises its instruments.
| Zone | Definition | What belongs here | Key rule |
|---|---|---|---|
| Clean zone | Areas where sterilised items and uncontaminated materials are stored and handled | Sterilised instrument packs, sealed needles, sterile gloves, unopened inks, clean linens, autoclave unload side | Nothing that has touched a client or procedure surface enters this zone |
| Transitional zone | The procedure area where client contact occurs | Procedure chair, instrument tray, machine and power supply, work lamp, client-accessible surfaces | Everything here is assumed potentially contaminated once a procedure begins |
| Contaminated zone | Areas where used items are handled before cleaning or disposal | Ultrasonic cleaner, instrument soaking sink, biohazard waste, sharps disposal, autoclave load side | Nothing leaves without being decontaminated or containerised |
The critical design principle is spatial separation with no backtracking. An artist should be able to collect a sterilised instrument pack from the clean zone, carry it to the transitional zone for the procedure, then deposit the used instrument in the contaminated zone without crossing back through a clean area.
2. Room layout and traffic flow
Procedure room design. A well-designed procedure room puts everything the artist needs within arm's reach, eliminates unnecessary movement, and keeps the client's path from reception to the chair from crossing through any contaminated space. Requirements include a handwashing sink inside the procedure room, minimum clear floor area of 3 m by 3 m per procedure station, doors that swing inward or slide, and a client entry path that avoids decontamination and storage areas.
Decontamination room design. The decontamination room is the dirtiest space in the studio. It must be physically separated from the procedure room by a wall and door. Within the room, workflow must move from dirty (soaking sink) through ultrasonic cleaning to the autoclave loading area, with sterilised packs exiting on the clean-room side. A dedicated deep sink used only for instrument cleaning is essential.
3. Surface materials
Every surface in procedure and decontamination rooms must be non-porous, chemical-resistant, and seamless. Porous surfaces harbour bacteria and cannot be reliably disinfected.
| Surface | Acceptable | Unacceptable | Notes |
|---|---|---|---|
| Floors | Seamless sheet vinyl, epoxy resin, sealed ceramic tile with epoxy grout | Carpet, unsealed wood, vinyl tiles (seams trap fluid) | Cove base at wall junction eliminates 90-degree corner |
| Walls | Semi-gloss/gloss paint, epoxy coating, FRP panels | Flat paint, wallpaper, unsealed drywall, textured finishes | Must be washable and chemical-resistant |
| Work surfaces | Stainless steel 304/316, solid-surface acrylic, epoxy resin | Laminate (seams swell), wood, glass | Stainless steel is standard; Grade 304 suffices for most studios |
| Ceilings | Smooth washable painted drywall, vinyl-faced acoustic tile | Standard acoustic tile (porous), popcorn texture | Smooth and cleanable in procedure rooms |
| Seating | Seamless vinyl or polyurethane upholstery on sealed frame | Fabric upholstery, stitched seams, unsealed wood | Torn upholstery must be replaced, not repaired |
A 2 mm gap between a benchtop and a wall collects contaminants within days. Building materials that create seamless waterproof junctions eliminate these micro-reservoirs.
4. HVAC and air quality
Airborne contaminants in a body art studio include aerosolised blood and body fluid droplets, pigment particles, disinfectant vapours, and ultrasonic cleaning mist.
Procedure rooms should maintain a minimum of 6 air changes per hour (ACH) with outdoor air comprising at least 2 ACH of that total, consistent with healthcare examination room standards under ASHRAE 170. Decontamination rooms should run higher at 10-12 ACH with local exhaust at the ultrasonic cleaner.
Air should flow from clean to less-clean spaces. Procedure rooms should be positively pressurised relative to corridors, and the decontamination room should be negatively pressurised relative to all adjacent spaces. A simple check: hold a tissue near the door gap. If air moves into the decontamination room from the corridor, the pressure gradient is correct.
Minimum MERV-13 filtration on supply air captures 90% of particles in the 1-3 micron range, covering most bacteria-carrying droplet nuclei. HEPA filtration is not required for routine procedures but is reasonable for implant-grade piercing or immunocompromised clients.
Procedure-area lighting: 1,000-1,500 lux at the work surface, CRI 90 or above, colour temperature 4,000-5,000 K. A single overhead light produces shadows; an articulating procedure lamp with a focused beam in addition to ambient lighting is the standard.