Ultrasonic Cleaning Science: The Step That Decides Whether Sterilisation Actually Works
Key Takeaways:
» Ultrasonic cleaning is the critical intermediate step between manual scrub and steam sterilisation; skipping it or rushing it produces instruments that look clean but carry shielded bioburden into the autoclave.
» Cavitation is the mechanism: millions of microscopic bubble implosions per second mechanically dislodge protein, lipid and pigment residue from crevices and lumens that manual scrubbing cannot reach.
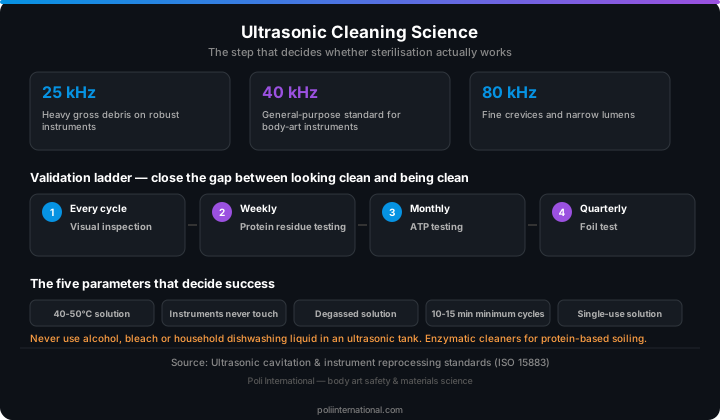
» 40 kHz is the general-purpose standard for body art instruments, 80 kHz reaches fine crevices and narrow lumens, and 25 kHz handles heavy gross debris on robust instruments.
» Enzymatic cleaners are the most effective solution for protein-based soiling; never use alcohol, bleach or household dishwashing liquid in an ultrasonic tank.
» Validation is not optional: visual inspection every cycle, protein residue testing weekly, ATP testing monthly and a foil test quarterly close the gap between looking clean and being clean.
» Temperature at 40-50°C, instruments that do not touch, degassed solution, 10-15 minute minimum cycles and single-use solution are the five parameters that decide success or failure.
1. Why ultrasonic cleaning is the critical middle step
A used tattoo or piercing instrument carries a biofilm: dried blood, plasma proteins, pigment residue, tissue fragments and lubricant. If any of this material survives into the autoclave, it bakes onto the instrument surface. Steam at 134°C cannot penetrate a protein crust, so what emerges from the autoclave looks sterile but is not. The biofilm underneath the baked-on layer was never exposed to sterilising conditions. This is called a sterilisation failure by shielding, and it is wholly preventable.
The instrument-processing chain in a professional body art studio has three links: manual cleaning for gross debris removal, ultrasonic cleaning for micro-debridement, and steam sterilisation as the terminal kill step. Each link must succeed for the chain to hold, and the ultrasonic step is the one most likely to be skipped, shortened or performed without validation. Manual scrubbing under running water removes what you can see, but it does not remove protein from instrument hinges, box-joint crevices, tube lumens, needle-bar solder joints or the microscopic surface texture of machined stainless steel. That invisible residue, typically 5 to 50 microns thick, is exactly what ultrasonic cleaning addresses. Critical point: ultrasonic cleaning is not sterilisation. It is pre-sterilisation cleaning, and no ultrasonic bath at any frequency can guarantee sterility. Instruments that exit the tank must still be rinsed, dried, packaged and run through a validated steam autoclave cycle.
2. Cavitation physics: what is actually happening in the tank
Ultrasonic cleaning works through acoustic cavitation. A transducer bonded to the underside of the tank vibrates at ultrasonic frequency, typically 25 to 80 kHz, transmitting pressure waves through the cleaning solution. During the low-pressure phase of each cycle the liquid is pulled apart and microscopic vacuum bubbles form; during the compression phase microseconds later those bubbles collapse violently. The collapse produces localised temperatures estimated at roughly 5,000 K and pressures exceeding 1,000 atmospheres at the point of implosion. These extreme conditions occur at a microscopic scale, inside bubbles typically 50 to 150 micrometres in diameter, only at the moment of collapse. The bulk solution stays at 40-60°C, but at the instrument surface each collapse is a micro-pressure-washer that mechanically dislodges adhered debris, denatures protein and emulsifies lipid films.
Two conditions must be met for effective cavitation. First, the solution must be degassed: fresh water contains dissolved air that cushions bubble collapse, absorbing the implosion energy instead of transmitting it to the instrument surface. Running without degassing reduces cleaning effectiveness by an estimated 30-50%. Second, instruments must be fully submerged with no air pockets, because a trapped bubble in a lumen or box-joint hinge creates a cavitation shadow where the surface behind it receives no cleaning at all.
3. Frequency selection and solution chemistry
| Frequency | Bubble diameter | Best for | Limitations |
|---|---|---|---|
| 25 kHz | ~120 µm | Heavy gross debris, dried blood, robust instruments | Can pit soft metals; cannot penetrate fine crevices |
| 40 kHz | ~80 µm | General-purpose body art instrument cleaning | Limited in sub-millimetre lumens |
| 80 kHz | ~40 µm | Fine crevices, hollow tubes, micro-tools | Lower energy per bubble, longer cycles |
Most studios operate a single-frequency 40 kHz tank, which is adequate for general use with sufficient cycle time and the right solution. Studios processing high volumes of hollow instruments or micro-piercing tools benefit from a dual-frequency tank or a sweep-frequency unit that modulates between 38-42 kHz to distribute cavitation energy more evenly.
On solutions, plain water is the least effective option: it carries no chemical capacity to break down protein or prevent re-deposition. Enzymatic cleaners, which hydrolyse protein into soluble peptide fragments, are the most effective for body art instruments because dried blood and tissue are protein matrices. Protease activity is optimal at 40-50°C and denatures above 60°C, and enzymatic solutions are single-use because once the enzyme has hydrolysed a protein load it cannot hydrolyse more. Neutral or mildly alkaline detergents clean through surfactant action and are adequate for lightly soiled instruments, but avoid household dishwashing liquid, which contains fragrances, dyes and foam boosters that dampen cavitation and leave residues incompatible with autoclave chemistry. Never use alcohol, acetone or flammable solvents, which pose a fire risk and fix proteins rather than removing them; never use bleach, which corrodes stainless steel at ultrasonic concentrations; and never use disinfectants in the tank, because cavitation aerosolises the solution and inhaling aerosolised glutaraldehyde or quaternary ammonium compounds is a respiratory hazard.
4. Temperature, loading and the five parameters that decide success
The optimal solution temperature is 40-60°C. Below 40°C, cavitation intensity drops because the higher-viscosity solution forms bubbles less energetically; above 60°C, enzymatic solutions denature. Set the heater to the midpoint of your solution's recommended range, typically 45-50°C, verify with a tank thermometer at the start of each session, and pre-heat the solution before loading instruments.
The most common ultrasonic cleaning error is overloading. Instruments packed against each other in a crowded basket shield each other from cavitation: the rule is that instruments must not touch, and each item needs its own cavitation envelope. Baskets must be open mesh or perforated so pressure waves pass through from the transducer below; box-joint instruments must be opened, not clamped shut; tubular instruments must be positioned so solution flows through the lumen; heavy instruments go on the bottom and light instruments on top; and nothing is stacked. Establish a validated instrument count per cycle and never exceed it; if volume grows, run more cycles, not fuller baskets. The five operational parameters are temperature at 40-50°C, proper loading, degassed solution, 10-15 minute minimum cycles, and single-use solution. Fail any one and the ultrasonic step fails regardless of the machine's price tag.
5. Validation and common errors
You cannot see a 10-micron protein film. Visual inspection tells you whether gross debris is gone, not whether the instrument is clean at the microscopic level required for sterilisation. Validation closes that gap. Visual inspection of every instrument every cycle, ideally with 3-5x loupes for box joints and lumens, is the minimum standard. A protein residue test weekly, rotating through instrument types, uses ninhydrin or biuret-based swabs to detect residual protein down to about 1-5 micrograms; a colour change means the ultrasonic cycle failed regardless of appearance. An ATP bioluminescence test monthly reads relative light units on a luminometer, with the pass threshold set at two times your known-clean baseline. A quarterly foil test, suspending a sheet of aluminium foil in the tank and running a full cycle, reveals dead zones: bare patches on the foil mean instruments placed there will not be cleaned.
| Error | Consequence | Prevention |
|---|---|---|
| Skipping the ultrasonic step | Protein bakes on in the autoclave, instruments not sterile | Tank is required equipment, no workaround |
| Reusing solution | Enzyme-depleted, contaminated water re-contaminates | Single-use per batch, or every 4 hours |
| Insufficient cycle time | Protein films not fully removed | 10 min light soil, 15 min heavy soil |
| Skipping degas | 30-50% cleaning effectiveness loss | Run degas before loading |
| Overloading | Instruments shadow each other | One layer, no touching, validated counts |
| Not rinsing after | Residues enter the autoclave | Rinse thoroughly, final rinse in deionised water |
A single failed protein residue test requires re-cleaning the entire batch and investigating the cause: expired solution, low temperature, overload, insufficient time or skipped degas. Skipping the ultrasonic step entirely is the single most common instrument-processing failure observed in studio inspections, and there is no workaround: the tank is required equipment for professional instrument processing.